Welcome to this tutorial that will guide you through the process of installing a map on your server. Before you begin, make sure your server is turned off. It's crucial to never manipulate the maps of a running server.
1 - Connect to your server using SFTP
The first step is to connect to your server using an SFTP client. If you’re unsure how to proceed, please visit the tutorial [MineStrator] Managing your server with SFTP using WinSCP or FileZilla by clicking here: https://forum.minestrator.com/threads/minestrator-manage-your-server-with-winscp-or-filezilla.1814/
2 - Transfer the map
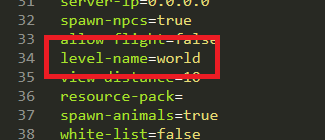
Before transferring the map, ensure you know the correct folder name where your map should be on the server. With a default Minecraft server configuration, the map is located in the world folder. If this folder doesn’t exist, you can find the folder name by opening the server.properties file and locating the name specified under level-name. If the name differs from "world," your map should be transferred into the folder with the specified name.

If a folder with the specified name from the server.properties file already exists and contains data, feel free to delete it if necessary. This data represents a default map generated upon server start if the folder is empty. You may also rename this folder to avoid losing data, as long as the new name is different from the one specified in your server.properties file.
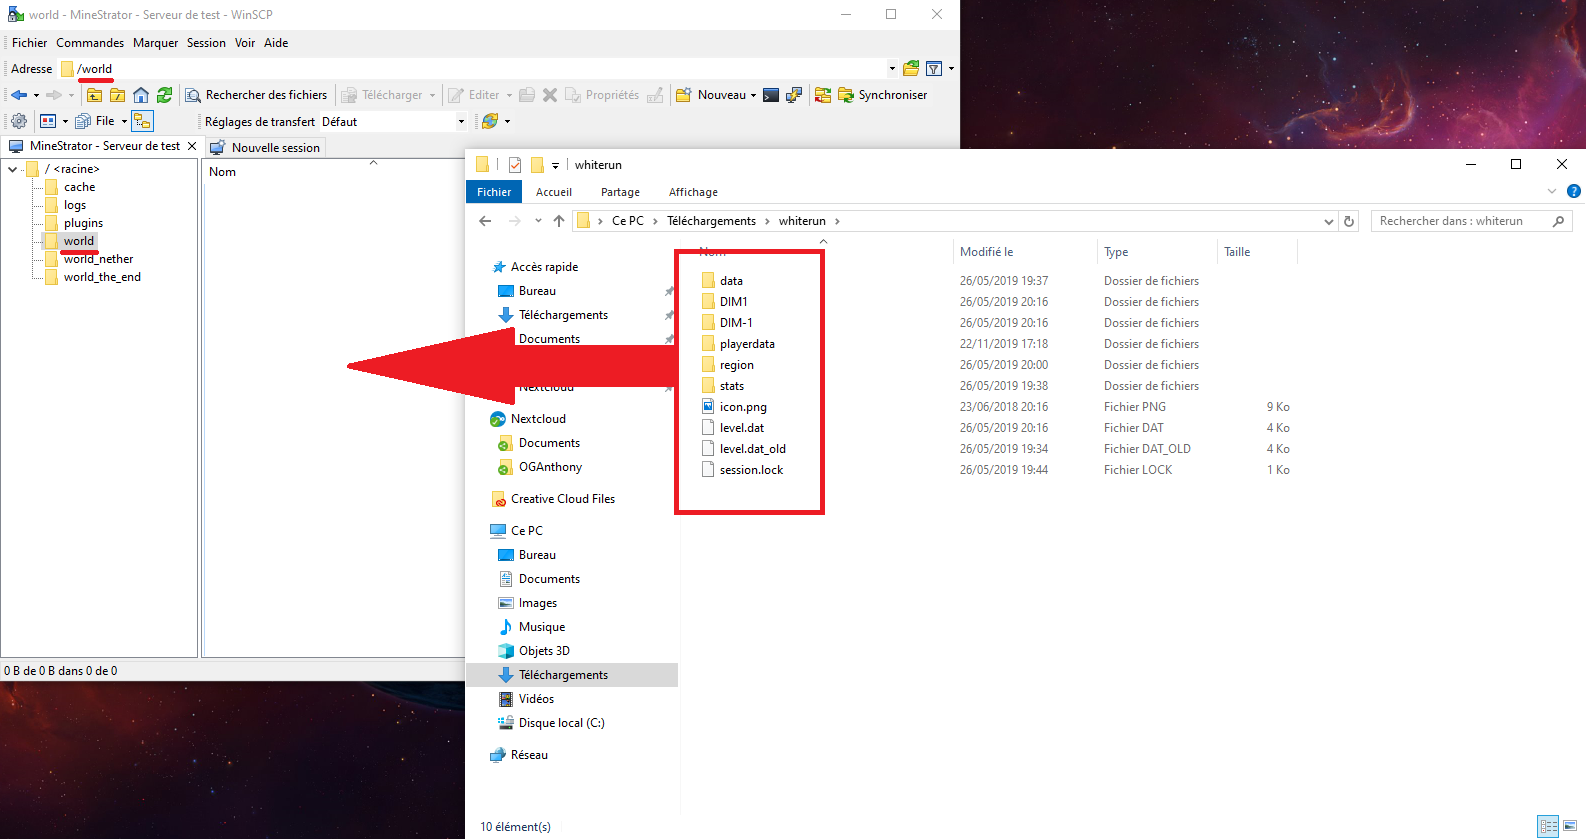
Once verification is complete, transfer the downloaded map files. A map consists of multiple files and folders, such as level.dat and session.lock, as well as folders like data and region.

After the map has been transferred, you can start your server and connect in-game to ensure the map is correctly in place.
That concludes the tutorial. If you need assistance with map transfers, feel free to join the MineStrator Discord community.
Happy gaming!
1 - Connect to your server using SFTP
The first step is to connect to your server using an SFTP client. If you’re unsure how to proceed, please visit the tutorial [MineStrator] Managing your server with SFTP using WinSCP or FileZilla by clicking here: https://forum.minestrator.com/threads/minestrator-manage-your-server-with-winscp-or-filezilla.1814/
2 - Transfer the map
Before transferring the map, ensure you know the correct folder name where your map should be on the server. With a default Minecraft server configuration, the map is located in the world folder. If this folder doesn’t exist, you can find the folder name by opening the server.properties file and locating the name specified under level-name. If the name differs from "world," your map should be transferred into the folder with the specified name.

If a folder with the specified name from the server.properties file already exists and contains data, feel free to delete it if necessary. This data represents a default map generated upon server start if the folder is empty. You may also rename this folder to avoid losing data, as long as the new name is different from the one specified in your server.properties file.
Once verification is complete, transfer the downloaded map files. A map consists of multiple files and folders, such as level.dat and session.lock, as well as folders like data and region.

After the map has been transferred, you can start your server and connect in-game to ensure the map is correctly in place.
That concludes the tutorial. If you need assistance with map transfers, feel free to join the MineStrator Discord community.
Happy gaming!