Tutorial: Transfer Your Minecraft World from Aternos to Minestrator
Introduction
Hi to all Minecraft enthusiasts! In this tutorial, we'll guide you step by step to transfer your Minecraft world from the host Aternos to Minestrator. Whether you're a seasoned player or a beginner, this detailed guide will help you accomplish this task smoothly.
Step 1: Download Your World from Aternos
To start, log into your Aternos account. Here's how to retrieve your world:
Step 2: Extract the Downloaded File
Once the world is downloaded, you'll receive a .zip file. It's necessary to extract this file to obtain your Minecraft world folder:
Once extracted, you should see these folders and files inside:
Step 3: Prepare the Minestrator Server
Before starting the transfer, ensure that your Minestrator server is turned off. It's crucial not to manipulate maps on a running server to avoid any data corruption.
Step 4: Connect to Your Minestrator Server via SFTP
To transfer your world, you need to connect to your Minestrator server using an SFTP program. If you're unsure how to proceed, please check this tutorial on our Minestrator forum to use WinSCP or FileZilla.
Step 5: Transfer the Map
Check of the Map Folder Name
Before transferring the map, make sure the folder name matches the map name on the server:
1. By default, the map folder is named world.
2. If you don't have a folder with this name, open the server.properties file.
3. Look for the line level-name to identify the map's name.
If a folder with that name already exists and contains data, you may delete or rename it to avoid data loss. Just ensure the name is different from the one provided in server.properties.
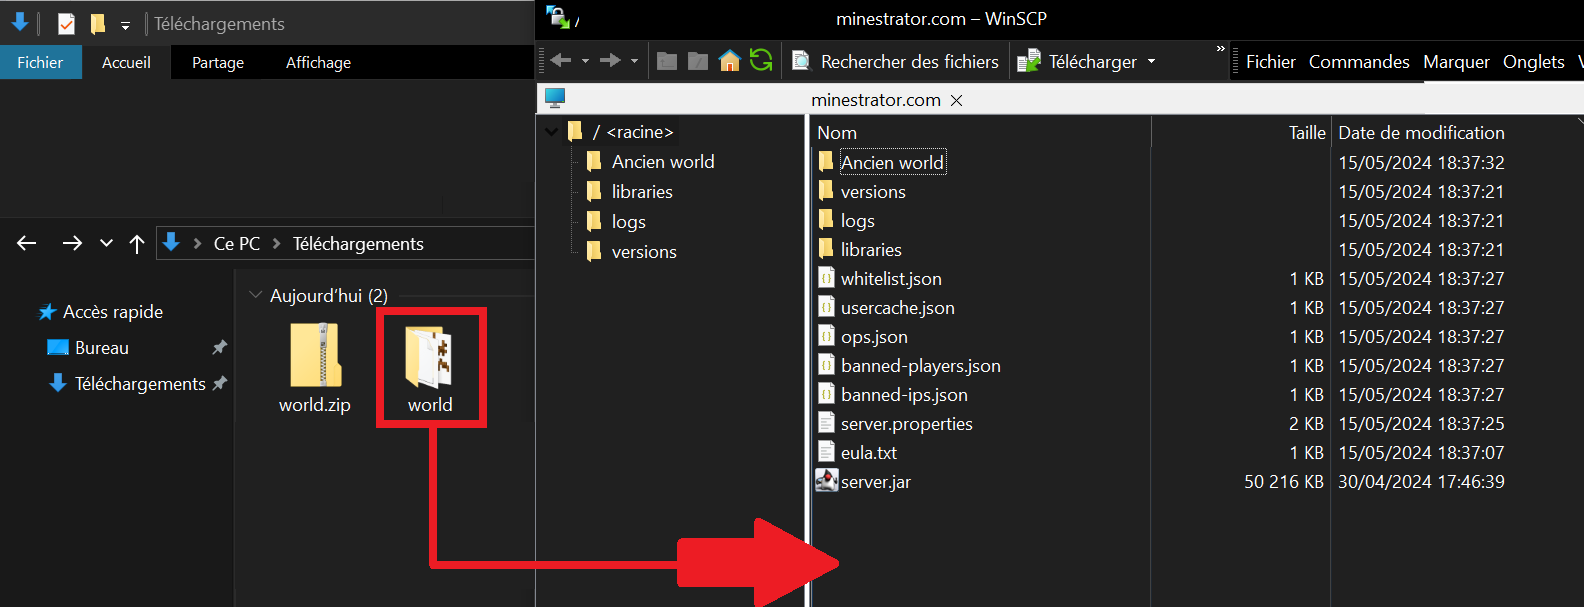
Transfer the Map Folder
1. Once you've completed this check, transfer the map folder to the server by dragging the folder.
2. If a previous map already existed, make sure to delete it before transferring the new map.
Step 6: Check Map Compatibility with the Server Version
Before starting your Minestrator server, it's crucial to confirm that your map’s version matches the server’s version. Follow these steps to ensure everything is set:
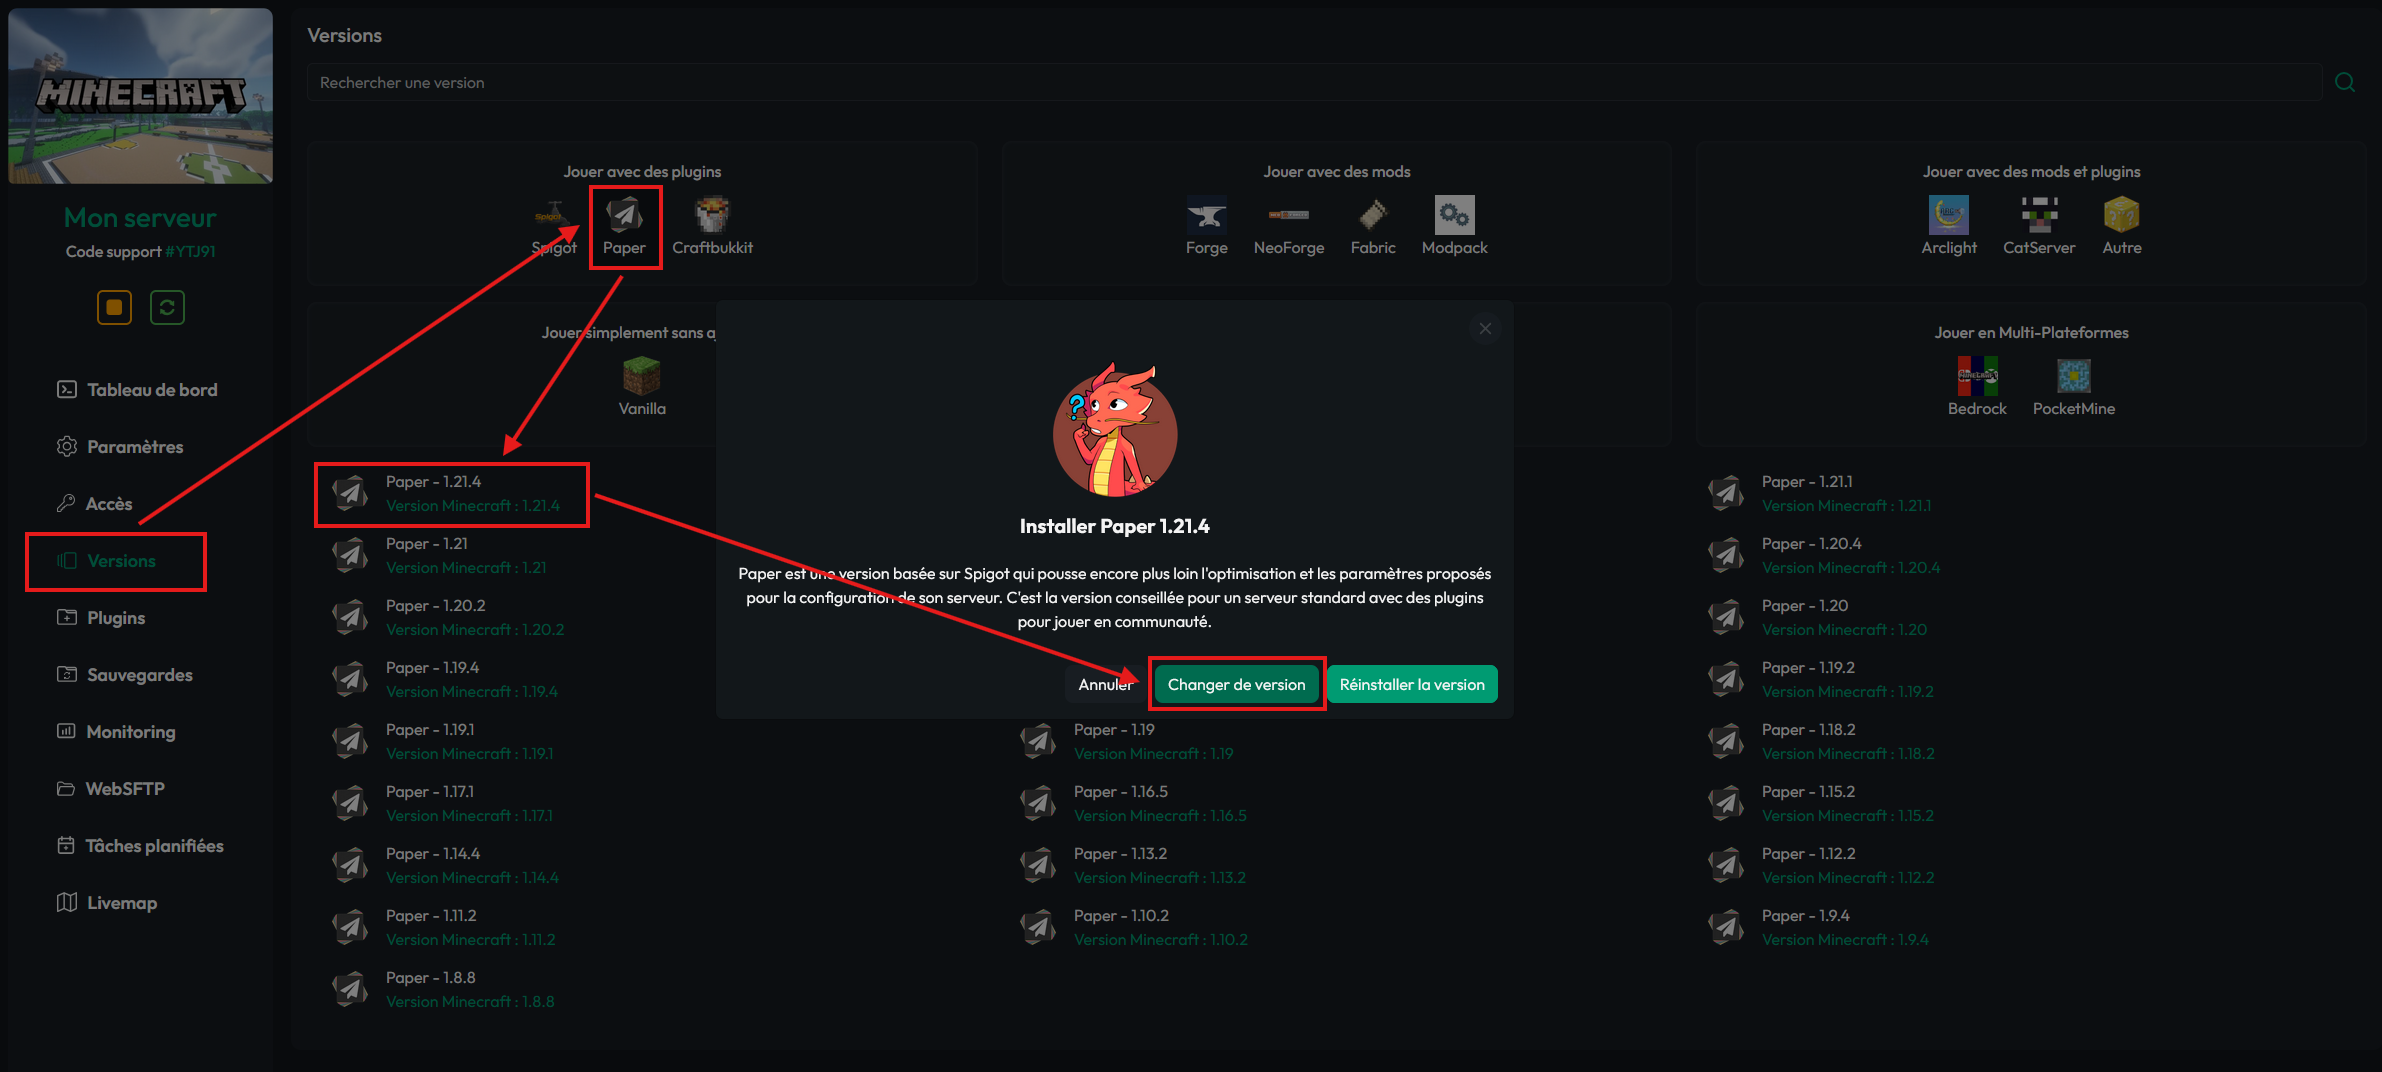
Check of the Map Version
1. Go to the "Versions" tab.
2. Locate the version used by your map.
3. Click on the desired version, then click "Change Version".
Modded Maps (Forge)
If your map is modded (using Forge, for instance), make sure to install the same mods as before on your Minestrator server.
Here's how to proceed:
By following these steps, you will ensure your Minecraft world runs smoothly on your Minestrator server, whether in vanilla or modded version.
Differences Between Vanilla and Spigot/Paper Versions
The Vanilla and Spigot/Paper versions of Minecraft manage the Nether and End worlds differently.
Vanilla Minecraft
When transitioning from Vanilla to Spigot or Paper, the Nether and End worlds transfer automatically. However, for transferring from Spigot or Paper to Vanilla, these steps are necessary:
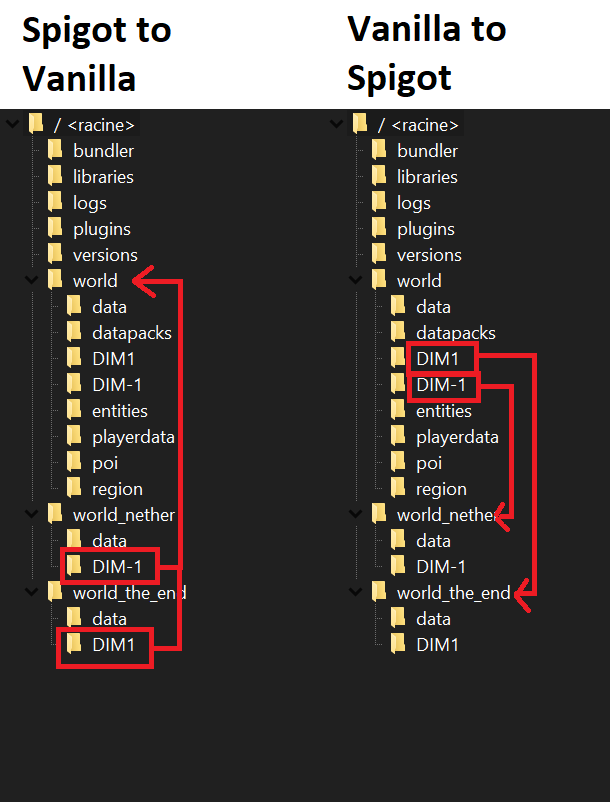
By following these instructions, you will ensure the Nether and End worlds are properly transferred and functional after switching versions.
Step 7: Start Your Minestrator Server
Once the map folder is correctly transferred, start your Minestrator server. Then log in to the game to check that your Minecraft world is present and functioning correctly.
Conclusion
And that's it! You've successfully transferred your Minecraft world from Aternos to Minestrator. If you encounter any difficulties or need further assistance, don't hesitate to join the Minestrator Discord for support.
Thank you for following this tutorial, and enjoy playing on your new Minecraft server!
Introduction
Hi to all Minecraft enthusiasts! In this tutorial, we'll guide you step by step to transfer your Minecraft world from the host Aternos to Minestrator. Whether you're a seasoned player or a beginner, this detailed guide will help you accomplish this task smoothly.
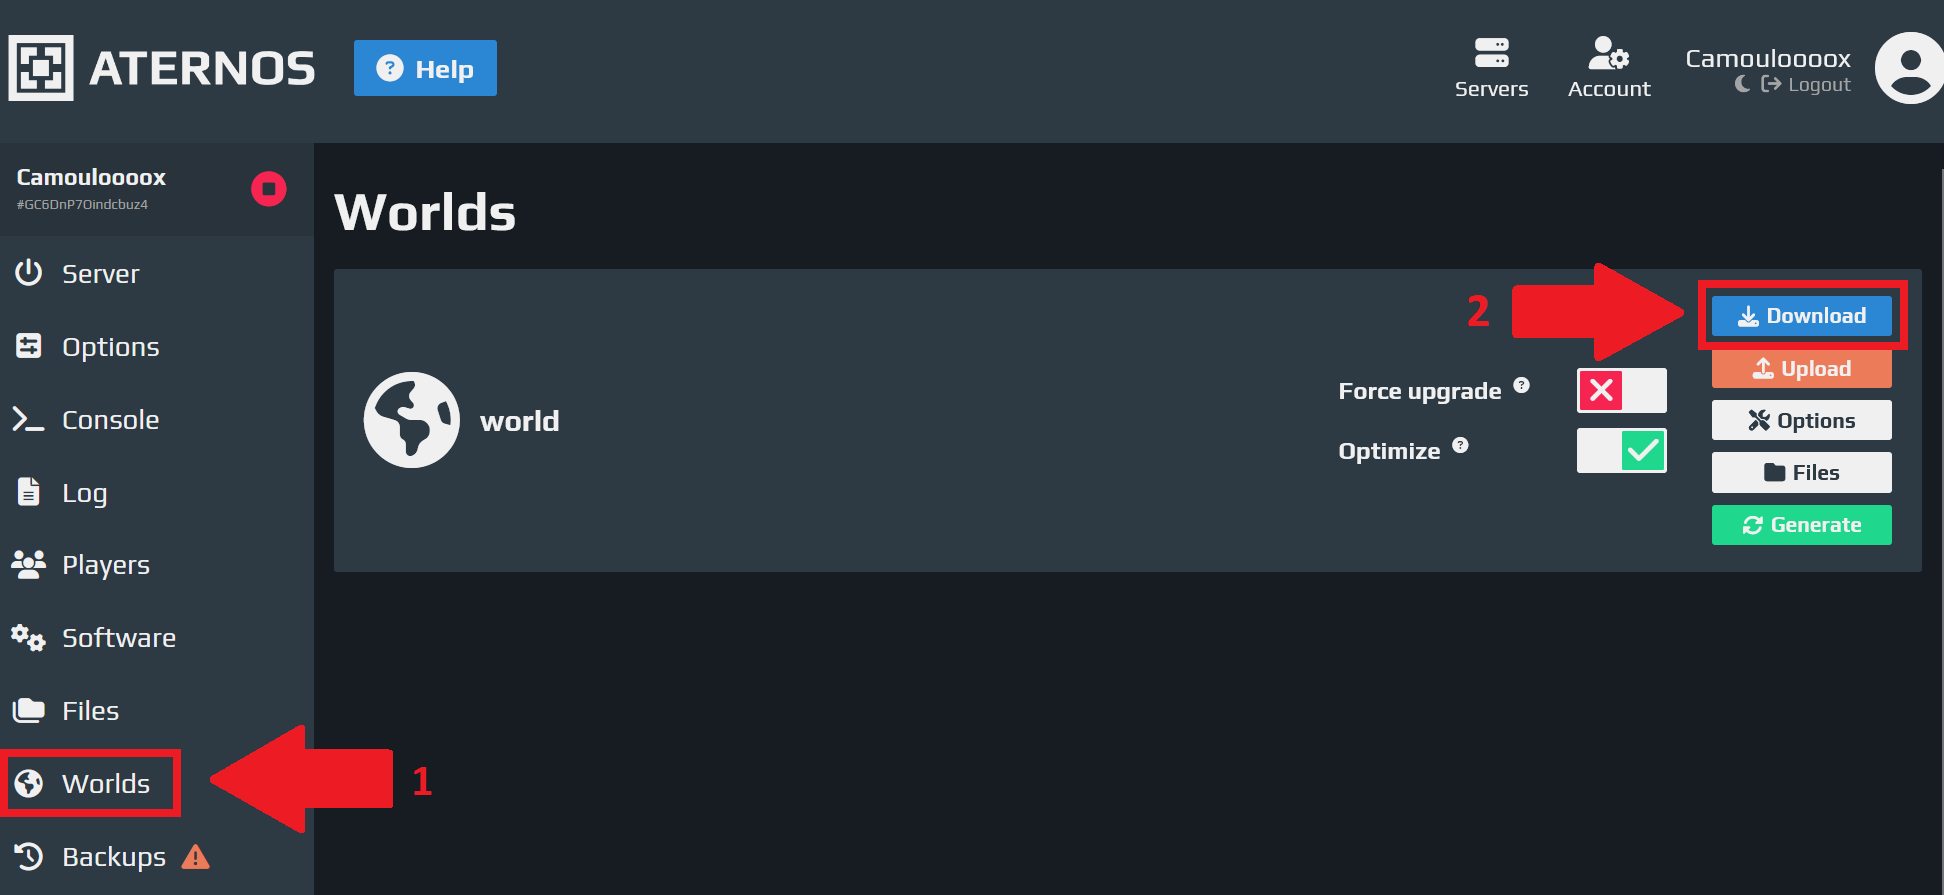
Step 1: Download Your World from Aternos
To start, log into your Aternos account. Here's how to retrieve your world:
- Go to the "Worlds" tab.
- Find your desired world.
- Click "Download" to get your Minecraft world.
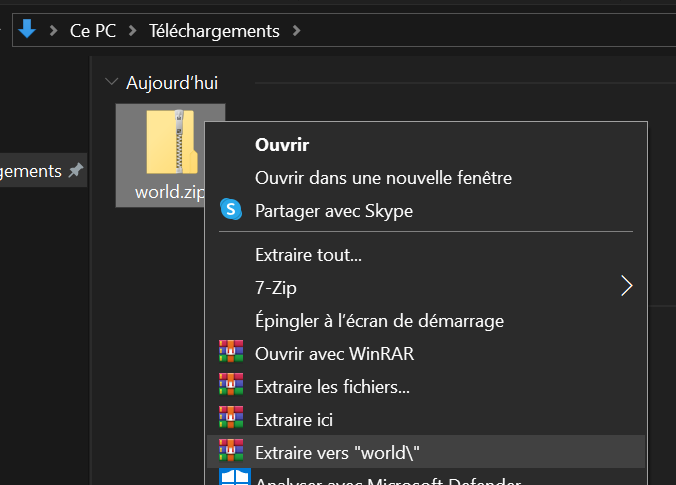
Step 2: Extract the Downloaded File
Once the world is downloaded, you'll receive a .zip file. It's necessary to extract this file to obtain your Minecraft world folder:
- Right-click the .zip file.
- Select "Extract" to get the world folder. (using a tool like 7zip or WinRAR)
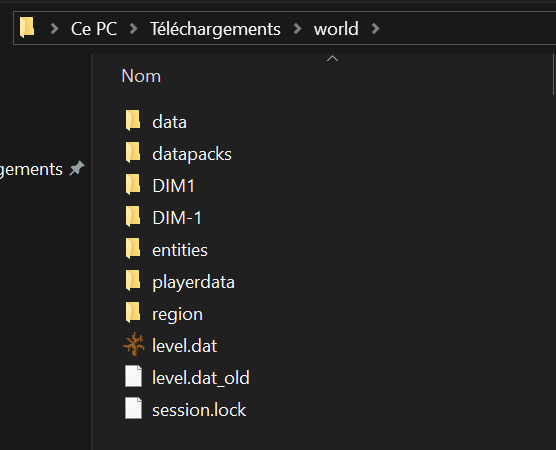
Once extracted, you should see these folders and files inside:
Step 3: Prepare the Minestrator Server
Before starting the transfer, ensure that your Minestrator server is turned off. It's crucial not to manipulate maps on a running server to avoid any data corruption.
Step 4: Connect to Your Minestrator Server via SFTP
To transfer your world, you need to connect to your Minestrator server using an SFTP program. If you're unsure how to proceed, please check this tutorial on our Minestrator forum to use WinSCP or FileZilla.
Step 5: Transfer the Map
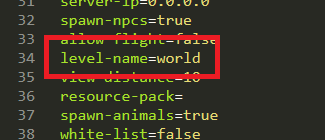
Check of the Map Folder Name
Before transferring the map, make sure the folder name matches the map name on the server:
1. By default, the map folder is named world.
2. If you don't have a folder with this name, open the server.properties file.
3. Look for the line level-name to identify the map's name.
If a folder with that name already exists and contains data, you may delete or rename it to avoid data loss. Just ensure the name is different from the one provided in server.properties.
Transfer the Map Folder
1. Once you've completed this check, transfer the map folder to the server by dragging the folder.
2. If a previous map already existed, make sure to delete it before transferring the new map.
Step 6: Check Map Compatibility with the Server Version
Before starting your Minestrator server, it's crucial to confirm that your map’s version matches the server’s version. Follow these steps to ensure everything is set:
Check of the Map Version
1. Go to the "Versions" tab.
2. Locate the version used by your map.
3. Click on the desired version, then click "Change Version".
Modded Maps (Forge)
If your map is modded (using Forge, for instance), make sure to install the same mods as before on your Minestrator server.
Here's how to proceed:
- List of Mods: Create a list of mods used in your previous setup.
- Installing Mods: Install these mods on your Minestrator server by following each mod's specific instructions. You can find a tutorial here: https://forum.minestrator.com/threads/minestrator-how-to-put-mods-on-your-server.1815/
- Mod Compatibility: Check that the mod versions are compatible with your server and map version.
By following these steps, you will ensure your Minecraft world runs smoothly on your Minestrator server, whether in vanilla or modded version.
Differences Between Vanilla and Spigot/Paper Versions
The Vanilla and Spigot/Paper versions of Minecraft manage the Nether and End worlds differently.
Vanilla Minecraft
- The Nether and End worlds are located in folders named DIM-1 (for the Nether) and DIM1 (for the End) inside the world folder (or your map's name).
- The Nether and End worlds are located at the server's root in separate folders named world-nether and world-the-end.
When transitioning from Vanilla to Spigot or Paper, the Nether and End worlds transfer automatically. However, for transferring from Spigot or Paper to Vanilla, these steps are necessary:
- Identify the Folders:
- For the Nether: world-nether
- For the End: world-the-end
- Replace the Folders:
- In the world folder, delete the DIM1 and DIM-1 folders.
- Replace them with the world-the-end and world-nether folders respectively.
By following these instructions, you will ensure the Nether and End worlds are properly transferred and functional after switching versions.
Step 7: Start Your Minestrator Server
Once the map folder is correctly transferred, start your Minestrator server. Then log in to the game to check that your Minecraft world is present and functioning correctly.
Conclusion
And that's it! You've successfully transferred your Minecraft world from Aternos to Minestrator. If you encounter any difficulties or need further assistance, don't hesitate to join the Minestrator Discord for support.
Thank you for following this tutorial, and enjoy playing on your new Minecraft server!